Showing posts with label Winter. Show all posts

Winter Wishes - Ram

 Hello Crafty Friends! Can you believe its December already?? Where did this year go! Well at least we have a new release to stave off the holiday stresses with. I'm here today with 'Snowman Globe' digi from Ram Stamps and I am totally smitten! Isnt it just the cutest ever? I love me a good snowman & you NEED to add this one to your collection.
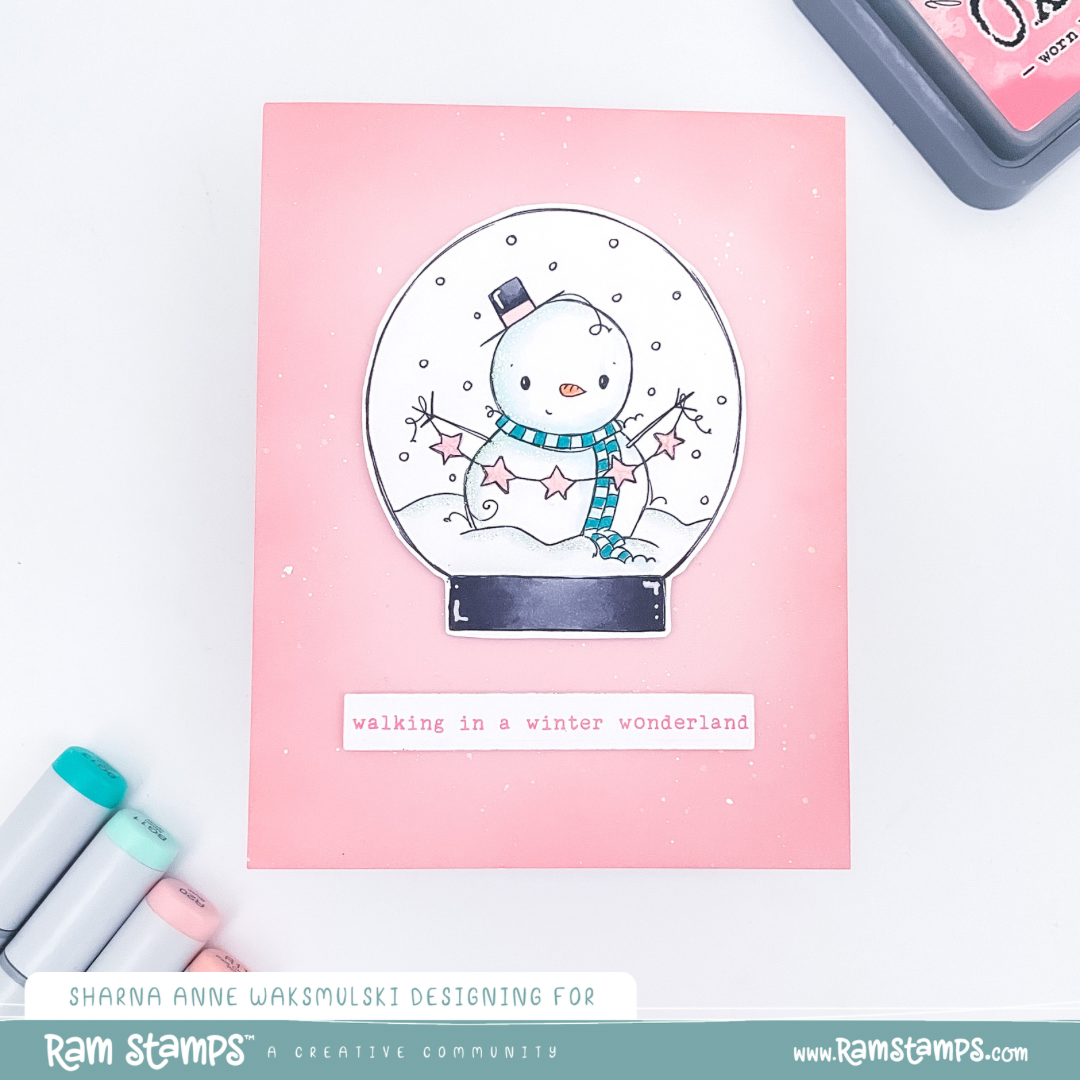
For the background on this card I started with some pink cardstock and did some spotlight blending with distress oxide in Saltwater Taffy. You can find a reel on my insta with a demo of this technique if you are interested.

I colored with copics and hand cut my Snowman Globe by hand. As a finishing touch I added some glitter to it as well as the snowbanks and a little glossy accents to the stars.

Copics: BG13, BG11, BG10, N8, N6, R20, R11 RV00, YR02, YR00

Thanks for stopping by!


Snow time - GCOC


Hello Crafty Friends! Thanks so much for joining. You should be arriving here from Jenn; a full list of participants is linked over on Jenn's Blog! Jenn is hosting a YouTube LIVE on November 17th at 8p ET sharing how she made this months card; that would be the perfect time to grab some of those supplies and craft along with us! 


For this month I was inspired by the current Lawn Fawnatics Challenge, "Make the Sentiment the Star". For the card background I used Cracked Pistachio, Broken China & Prize Ribbon distress oxide inks. Once that was dry I added some Gansai Tambi starry colors in yellow gold as some splatter. Then I combined the Deer from Ugly & Bright with the snowflake sweater and the deer from Say What? Holiday Critters. I used E47, E44, E43, E41 on the faces & antlers and BG13, BG10; B69, B66, B63 on their sweaters to go with the background. I then die cut the Giant Let it Snow out of sparkle cardstock in Pixie Dust. Once it was all assembled I decided it needed some extra snow and used a few snowflakes from Happy Howlidays (but really there are lots of sets with snowflakes you can use instead)


Thanks for stopping by!

November - Get Cracking On Christmas

  Hello Crafty Friends! It’s time for another installment of Get Cracking on Christmas hosted by Jenn Shurkus. Every month on the 3rd Thursday we are here with fresh inspiration for you! Please check out Jenn's blog for a full list of each months participants. Don't miss Jenn's LIVE on YouTube November 19th at 8pm ET.  www.youtube.com/jennshurkus where she will have a demo on how she put together her card for this month!   


For me this month I have a set of three cards (well actually it was a lot of cards but I'm specifically sharing these three here today) made using the new Lawn Fawn Snowflake Background Stencil! These are super easy to put together, great for those last minute makes or if you have a whole bunch you need to make at once like I did!


First I used distress ink in several of the new colors; Villainous Potion, Salvaged Patina & Kitsch Flamingo. I did a light watercolor wash on the background. To do this I first used a brush to lay down clean clear water in the area I wanted, leaving a boarder of plain paper. Next I dropped in the color and smushed it around with my brush until I was happy. I was careful not to go outside the original edge I had made with the clear water. 

Next I used the stencil and I selectively inked the center portion to make it look as though the snowflakes were falling down the center of each card. I used a bit of stickles in Diamond to coat some of the snowflakes for extra bling. 


For the sentiments I used the Winter Big Scripty Words which has been a long time favorite of mine since it came out back in 2016. Its just so versatile. I stamped these in the same ink to match the background. The purple one I just adhered flat since its great for mailing and I felt it stood out the best from the background. The pink is popped up on foam squares. And lastly the teal one I added some sparkle pen and a layer of Nuvo Crtsyal drops in Morning Dew for that extra dimension. 

Thanks for stopping by!

Little Polar Bears - Pretty Pink Posh

 Hello Crafty Friends! I am here today with a new winter card featuring the Bear Friends stamp set from Pretty Pink Posh. For a more winter feel for this card I turned the bears into Polar Bears. I was inspired by a recent video from Christy of Christy Gets Crafty who showed this idea! 


For the background I used distress oxide inks in Cracked Pistachio, Evergreen Bough & Chipped Sapphire. I splattered for snow with Dr. Ph Martins Bleed Proof white which worked really well. For the copic coloring I used C3, C1, C0 & 0 for the polar bears with a little R11 for the ears and cheeks and toe beans. For the stump I used E43, E40 and a little YR21 for the leaves. 

Thank you so much for stopping by!


Get Cracking on Christmas - with Jenn Shurkus

Hello Crafty Peeps! Thanks for joining me on another edition of Get Cracking on Christmas!


My good friend Jenn Shurkus (Shurkus.com) has been doing the Get Cracking series for several years. Each month on the third Thursday she will be posting new inspiration and hopefully encourage you to get Cracking on Christmas!

If you want to participate (and there is a prize!) head over here to the link up! Or use the hashtag #getcrackingonchristmas on Instagram to participate.

Today's card is a slimline, mostly because I'm now obsessed with this style! I used several Lawn Fawn sets in this card including my favorite snowman!


I started this card with the background. I die cut the panel using a slimline die and some Neenah cardstock. I cut a second panel using the same die that I used to cut my boarders from so they would have the stitching around the edges too. The background started with a layer of distress oxide in Shaded Lilac. Over that I brought in blueprint sketch to make my favorite indigo color. At the very edge I added a bit of wilted violet. I then splattered the whole thing with liquid stardust. The greeting I added with some white embossing. I always use the Lawn Fawn white embossing powder for all my embossing because its so smooth but still can handle the smaller detailed sentiments too.

I used copics to color my images; blues in B69, B66 & B63, Greys: N8, N6, N4 & N0, Teals BG13, BG10 & BG0000, Dark Teal in BG78, BG75 & BG 72 Greens G85 & G82 Lgt Greens G17 & G12.

I added sparkle using some the jellyroll sparkle pen to the presents, the snow on the houses and the tops of the mountains. 


Thanks so much for stopping by!


Santa Bear is coming to town! - Avery Elle

Hello Crafty Friends! I am back with a stamp set designed by my friend Elena for Avery Elle. I was so excited to see Bear all dressed up as Santa!  This set has a special place in my heart because I just absolutely treasure the time my son has spent with out local "Santa". I know someday the magic will end but I am so glad to see his wonder and excitement. Our kindhearted resident travels around our local area and my son has not met any other Santa (so far). Every year he stops for lunch at our little coffee shop and all the kids come and see him. Its such a fun personal magical meet and greet. I cant imagine it any other way now.


Snow Much Fun - Mama Elephant

Hello crafty friends! Today I have a card featuring some Mama Elephant stamps and dies. I just love the whole little agenda series. I have several cards coming up featuring them. Today's card is all about the Little Snowman Agenda! I have paired this up with the Star Grid Window.


I stared off today's card by die cutting the Star Grid Window into some Neenah 110lb plain white cardstock. I then taped all the stars into place from the back with washy tape so I would have a flat surface to do my ink blending. I inkblended using a large blender brush and distress oxide ink in Shaded Lilac which I brought down 2/3rds of the way. Near the top I added a little bit of Blueprint Sketch to deepen the color. Once my blending was done I splattered the whole panel using plain water, distress ink in Shaded Lilac as well as some Gansi Tambi starry watercolors in white gold and light gold. I then heat embossed a sentiment from Mini Merry Messages in Liquid Platinum. Once I was done I removed the washi and affixed the window portion directly to my cardbase. The stars themselves were popped up using foam tape.


The little snowmen I colored in using copics I thought went well with the background colors. for the snowmen bodies themselves I used a little BV000 for the shading. The blues are all B69, B66 & B63. I colored the heart and one of the presents using RV10 & RV00. Greys are N8, N6 & N4. Lastly I added some Silver Mini Star confetti from Pretty Pink Posh.

Thanks for Stopping by!


Yeti Hugs! - Hello Sweetums

Hello my crafty friends! I've finally found my winter mojo and Ive been playing with all my new and old stamps. I grabbed up this Hello Sweetums Yeti Set Go stamp set during the last sale & if you hurry the Black Friday sale will save you 30%! I also snagged a bunch of the scene building dies like the Mountains of Magic dies & Slippery Slops dies I used to create my winter valley here.


I used plain white cardstock to die cut all my scene pieces and then inked them with distress oxide inks. The sky is Tumbled Glass; the back set of larger mountains I did Shaded Lilac with a top layer of Blueprint sketch to darken them up; and finally the smaller mountains are just Shaded Lilac. I love blues and purples for winter! I also stamped the sentiment using the Shaded Lilac distress oxide as well.

The little yeti buddies I colored with copics: N2, N0 for the fur,  B02, B00, B0000 for the face of the Yeti on the left, BV13, BV01,BV000 for the face of the Yeti on the right & Y13, Y11 &Y000 for their little horns.

Thanks for stopping by!


Happy Hamster - Waffle Flower

Hello crafty friends! I am so excited to be guesting for Waffle Flower for this release!! When I received this stamp Winter Hamsters set and I admit I might have squealed in happiness a tiny bit. These chubby little hamsters are just adorable. I already own the office hamster set so I was delighted to see a Christmas set. By the way, an extra neat feature with the dies is worth a look. The way the stamps are grouped means you stamp them and the dies are all on one so you can cut a bunch at once. This is especially handy for all the little coordinating images for scene building.  I am including a video for today's card as well, click here to go to the HD version on YouTube. I'd love it if you gave a follow as well. I hope you enjoy :)


Pretty Pink Posh October Blog Hop - Day 2


Hello Craft Friends and thank you for joining me today on this Pretty Pink Posh blog hop! Today is the second day so if you missed day one be sure to stop by the Pretty Pink Posh blog for all the stops for day 1 & 2. Be sure to leave comments along the way for your chance to win one of the 4 $25 shop gift certificates that are up for grabs!


My card today features the new Holiday Signs Stamp set and coordinating dies. I also used last years Penguin Pals stamp set. Don't they just look so cute together? I copic colored the images using some bright fun colors I thought set off against the background.

Copics Used: B06, B02, B00; YR00, YR02; BV04, BV01, BV000; RV10 R81, RV000; N2, Colorless Blender.


The background features the new Snowflake Stencil. For this I first blended the background using my blender brushes. The background is Blueprint Sketch, Mermaid Lagoon & Broken China. Once the background was blended I placed my stencil over and blended on more Broken China. This is what gives the appearance of a fade since at the bottom the color is the same.


For a finishing touch I added the Winter Sparkle Sequin mix. I thought it went well with the colors and the theme.

Thank you hopping with us!

Blog Hop Day 2:


Yeti Wishes


A new card is up on the B.R.I blog today. For details please visit them here!

Hello Everyone, Welcome to My Stop on the LawnScaping Winter Blog Hop!  


You should have arrived here from Thinking Stamps; if not, be sure to check out her page & all the rest!

Lost on the hop? No problem, start at Lawnscaping and don't miss a thing!

There will be lots of fun prizes to win so be sure to leave a comment here & on all the other blog hop pages as well! All the specific information about the sponsors and prizes can be found on the Lawnscaping home page. Everyone will have until Sunday, 12/15 at 11:59PM EST to leave comments to be eligible for a prize.


So the theme was winter & this is what I created!


I started this card with the background. I first masked the edges of a 5in x 11in piece of white 100lb cardstock with some washie tape. Next I took tumbled glass distress ink and using an ink blending tool filled in the center and lower portion of the frame. Next I brought in some peacock feathers along the center and upper portion. Near the top I used a bit of faded jeans & a very tiny bit of black soot. I then lightly misted the card stock with some water & heat set.
I then scored the card evenly (just under two inches & 4 inches on each side) and made sure they lined up in the center. I added some of Lawn Fawn's adorable Critters in the Snow. I just love this set & have been using it a lot this year. I also used the sentiment from the Winter Fox mini set & the banners from Bannerific. Lastly I used some snowflake sequins. I left some space over the pengins to write a message.

Keep Hopping! 

The next stop on the hop is: Creative Palette 

Lost on the hop? No problem, start at Lawnscaping and don't miss a thing!


This is another holiday card. I love this stamp set from Mama Elephant! The deer that come with this set make my heart happy. I have a soft spot for deer. Anyways... I made the background using distress inks - black soot, faded jeans, peacock feathers & spun sugar blended in to create the purple. I sprinkled the paper with some water to create this effect. See this post by Jennifer Mcguire for how to do this! The banner was heat embossed with silver embossing powder.

Stamps Used:

Frosty Polka Dots

 I am playing along with this weeks Lawnscaping Challenge
This theme is one of my favorites since I LOVE polka dots! 
I use polka dots in a ton of cards.


So I have a new card today, all decked out for winter. I haven't done many winter themed cards yet this year. Lots and lots of christmas, but not to many winter. That is going to change shortly since I have so many adorable winter stamps. I have used Frosty Friends for this card, along with some snow from the Let It Snow stamp set.

Stamps used:
 

**Woohoo! small edit to add that I got a new badge for this card from Lawnscaping Challenge. If you love Lawnfawn and haven't played along yet, go check them out!
 photo TopMowitAll_2013_zps6f8204dc.jpg

A2 Card Box


I have had an obsession with making these boxes since I first saw them on Nicole's page. So stinkin' CUTE! I could not resist making a few. I think I will be giving them out with card sets this year for the holidays. The only thing I changed was to add Velcro because I love Velcro. Nicole has a video shared on the Lawn Fawn Blog here. Go check it out!


Products Used:

Yeti.Set.Go! - New Lawn Fawn

I got a bunch of new Lawn Fawn new release stamps & paper sets. I will be doing more posts with each set. Today I went a little crazy over Yeti Set Go. The adorable Yeti was impossible to resist. While I know this will be more popular in the coming months I couldn't resist a little playtime now.

1.  
2. 
3. 


For card 1 I used the yeti stamp and and a snow flakes in a repeating pattern to create the border. The yeti was colored with copic marker BG15 Aqua. I just did a simple wash of color, no shading. The card base is a deep grey from Bazzill basics. I don't have the exact color as it was my last piece and it was a scrap. It is 5 1/4 x 4 1/4. Most of my cards are done on those dimensions. The ribbon is American Crafts Aqua polka dots. The sentiment is stamped on a light grey Bazzill and I cut it out as a banner. 

For card 2 I stamped the yeti on some white card stock, colored him with BG10 cool shadow and cut him out. I used a black marker (crayola super tips because I had them on hand) to finish the edge. I then stamped the trees on another sheet of white paper and outlined the bottom of each branch also with cool shadow to make them pop a bit. I don't have the exact size, as I usually eyeball everything. The card base is 5 1/4 x 4 1/4 and I nestled the other layers down from that. The white/blue layer is square. Anyways, I cut the wave into the white card stock for the snow and glued it onto a piece of blue polka dot paper. The sentiment is stamped on white card stock and I cut it out as a banner and layered it onto some dark grey card stock .  Lastly I added some silver sequins.

For card 3 I stamped 2 yeti on some white card stock and colored one with copic marker C1 cool grey and the other in BG10 cool shadow. I added a small flower crystal to the "girl" yeti. I cut two wavy pieces of white card stock and layered them on a piece of Studio Calico Nantucket. I used foam tape to pop it up. I tucked the yeti behind the "snow" and popped them up with foam tape as well. The sentiment is stamped on white card stock and I cut it out as a banner and glued it on with a slight wave in the middle to give it some dimension on the card.

For card 4 I used my nested circle dies. I used the largest which just fits inside an A2 envelope. I also die cut some white and my blue polka dot in a slightly smaller circle. I cut out the mountain from grey and white card stock and stuck it right to the blue polka dot paper, I then layered the white snow with foam tape. I stamped the sentiment last, but if I had thought about it I would have done it before adding the white to the card. Yeti is colored with both C1 for his fur and BG10 for his tummy, face and hands.

Products Used: