Showing posts with label ink blending. Show all posts

Koality Christmas - RAM

Happy Thursday crafty friends! Im excited about two new stamp sets just released by Ram Stamps! Today I am sharing some inspo for the new 'Koala Christmas Tree' digital stamp. I just adore Koala, they are one of my favorite animals!

For the background I blended Salvaged Patina & Peacock Feathers distress oxide inks and I splattered bit of white gold starry watercolors. And I know it wouldn't be snowing in Australia during Christmas but I couldn't help myself. 

Copics Used:
G28, G24, G21
E44, E43, E41
W5, W3, W0
R29, R27, R24, R20
YR02, Y13, V01, B00

Thanks for visiting!

Nutcracking Christmas - RAM

 Hello Crafty Friends! I’m here with a brand new Digi Stamp release from Rachelle Anne Miller, “The Nutcracker Scene Creator”! 

I started with copic coloring the main images. I am sharing the colors I used for each of them. The accessories are using the same combos as well. 


For the background I started with some green cardstock from my stash that matched well with Pine Needles distress oxide. This saves me a bunch of time from having to ink blend a whole panel from scratch. I took that pine needle distress oxide and went around the edges leaving a good portion in the middle untouched. Then I used black soot distress oxide very sparingly around the edges on top. This nicely draws the eye into the middle where our focal point will be. Lastly for the background I added some splatter in Blue Gold Gansai Tambi starry water colors.

As a kid I grew up watching the theater and ballet and my absolute favorite was definitely The Nutcracker. My mom and I still try and go every few years to a performance and it’s always magical. I even have a Mouse King ornament we bought at one of the performances years and years ago. That’s what inspired the color palette for me today. 

Thanks so much for stopping by!

Thank You - RAM

 Hello Crafty Friends! Happy Sunday! I’m here with a  Rachelle Anne Miller digi design “Canadian Beaver” because I couldn’t resist this sweet pair. I decided to add a fall twist just because. 


For the background I used distress oxide in Salvaged Patina, Peacock Feathers & Uncharted Mariner. There is a reel of the ink blending up on my Instagram (cardsbysharna) if you are curious. I then white heat embossed the sentiment, it really pops off of the teal in the background. Then I copic colored the images. 


Copics used:

E49, E47, E44, E43 {tails}

E29, E27, E25, E23, E21 {bodies}

RV69, R46 {leaf}

YR18, YR16 {leaf}

Y38, Y35, Y13 {leaf}

YG67, YG65, YG61{leaf} 


Thanks for stopping by!


Dream Big - RAM

 Hello Crafty Friends! Hope you are having a wonderful week. I’m here with a DT project featuring 'Dream Big Circus'  from Rachelle Anne Miller Stamps. 


For the background I did a blend with distress oxide inks. I used Scattered Straw, Saltwater Taffy and Abandoned Coral. Then I splattered the whole thing with white gold Gansai Tambi starry water color. Lastly I stamped the frame around the sentiment (lawn fawn) and used the die to cut it out.

Copics Used: E55, E53, E51, E50; R22, R20, R11, R00; YR21; C0, C1

Thanks for stopping by! 

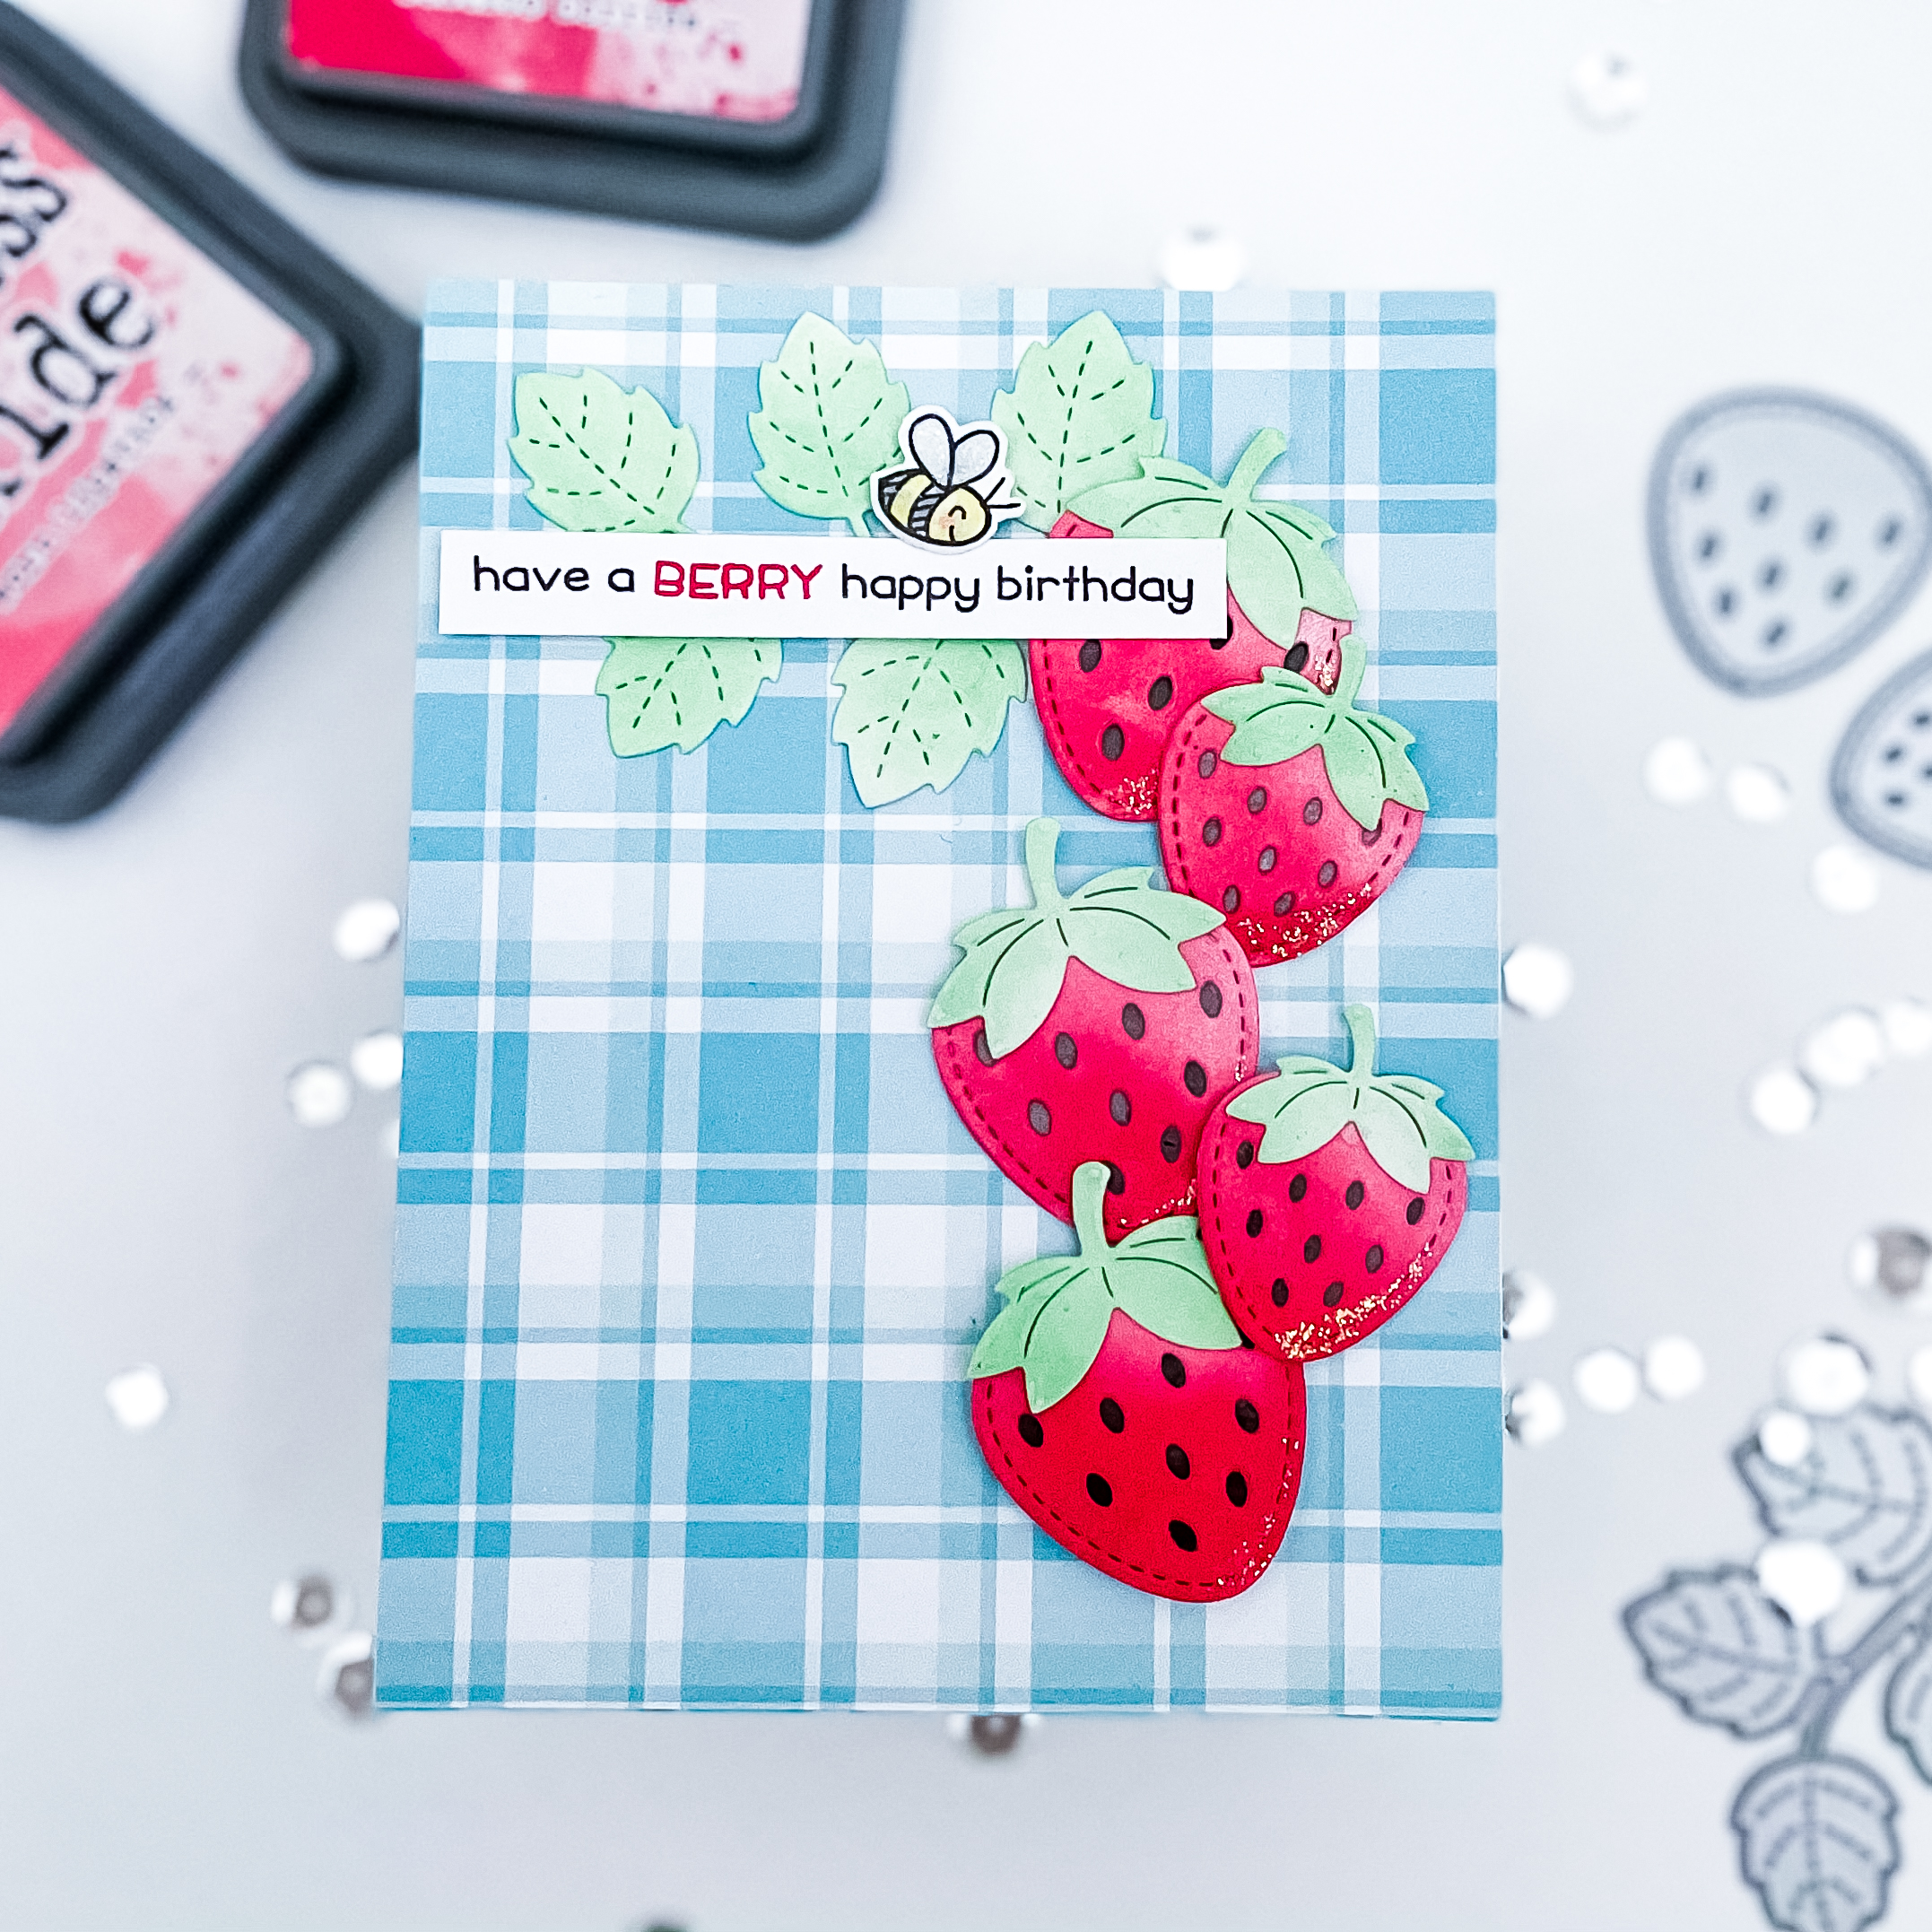
LAWN FAWNATICS CHALLENGE 119 ENTRY – CARD SKETCH

 Hello Crafty Friends! I am back with a new entry for the Lawn Fawnatics Challenge. Again slipping in close to the wire. I had the idea in my mind but life gets crazy with balancing all the things that need to get done in a week. 


The background paper is the perfectly plaid remix, Nancy! I then die cut the images from Strawberry Patch from Bristol paper so I could do some ink blending. I used distress oxide ink in Worn Lipstick, Festive berries and Cracked pistachio. For the bee hes from the Bee Mine mini set, isnt he so cute? Lastly the sentiment is from How you Bean? Strawberries add on.  


Thanks for stopping by!


September - Get Cracking On Christmas

  Hello Crafty Friends! It’s time for another installment of Get Cracking on Christmas hosted by Jenn Shurkus. Every month on the 3rd Thursday we are here with fresh inspiration for you! Please check out Jenn's blog for a full list of each months participants. Don't miss Jenn's LIVE on YouTube September 17th at 8pm ET. www.youtube.com/jennshurkus where she will have a demo on how she put together her card for this month!   


This months card features some fun Lawn Fawn products! I hadn't gotten to these mug dies last year so I absolutely had to use them before I get distracted by tomorrows new release!! 


For this card I started with Lawn Fawns mermaid cardstock which I then blended on with Peacock distress oxide ink around the edges leaving a little cardstock showing in the middle. Then I added Mermaid lagoon on top of that. Once I this ink dried I added some white gold Starry Watercolor splatter for a snowy look. I die cut the mug frame out of some red cardstock scrap I had and the background mug from Lawn Fawn Snow Day remix. I used some white sequin mix for my shaker. I die cut the marshmallows out of plain white carsdtock and added stickles in diamond as an accent. (Gotta have some glitter somewhere, right Jenn??) Lastly I die cut my letters using Cole's ABCs and stamped the smaller Holiday sentiment in Peacock distress ink. 

Supplies:


Spring Robin - Pretty Pink Posh

 Hello Crafty Friends! I am here with a mini slimline card featuring some adorable birds from Pretty Pink Posh. I decided to go with Robins as the stamp is named for Spring and the gorgeous robin eggs. I chose a sentiment for this card to work at any time. I did a simple ink blended sky background with distress oxide ink in Broken China. I used copics to color the images. Hope you are inspired to create your own simple cards!


Supplies: 

Spring Robins Stamp Set - PPP

Broken China Distress Oxide - Ranger Ink


Thanks for stopping by!

Pretty Pink Posh March Blog Hop!


Hello Crafty friends it’s release week for Pretty Pink Posh! This release is jam packed with goodies. You definitely need to check out the whole release HERE and probably save yourself some money and just order the whole bundle!


I couldn’t resist these adorable bunnies from the new Easter Bunnies stamp set. This is a mini slim line card. I used one of the Scalloped slimline frames over a Cracked Pistachio inked background. The buns and extras are copic colored. 

Copics Used: 

E,47, 44, 43; RV11, 10, 00; YR02, 00; G02, 00; R11; B00


There are 3 $25 gift certificates up for grabs (one winner each day). Winners will be picked randomly along the blog hop. Comments must be left by 11:59 PM PST on 3/16/2021. Winners will be announced on the PPP blog.

Blog Hop Day 3


Thanks for Stopping by!

Shake it Shake it! - Pretty Pink Posh

 Hello Crafty Friends! Back again with ANOTHER birthday card! Never to many of those and they always come in handy! This one is a shaker card featuring some new goodies from Pretty Pink Posh. 

First I used the circle from the Lets Party Coordinating Dies to cut the window from the cardstock. I ink blended on the cardstock with distress oxide ink in Peacock Feathers on the top very lightly and then Shaded Lilac from the bottom. Once that was done I took the Yellow Gold from the Gansai Tambi Starry Colors to splatter the background with. 


I put acetate behind my window and a double layer of foam tape to form my shaker. I filled the window with the new Daydream Clay Confetti which I adore! The colors of the card were obviously inspired by that. I then stamped the a piece of cardstock with the main image from the Let's Party Stamp set in a very light grey which I used to close the shaker before attaching the whole thing to a card base.


So to finish this design I wanted to keep it simple so I could make several of them to have on hand! I die cut the present from the Lets Part Stamp Set and did some quick coloring. BG13, BG10, BG000; Y02, Y000. I also used a sentiment from that set and white heat embossed it on black. The present is popped up on foam tape in the center of the window but the sentiment strip is glued directly to the base.

Thanks for stopping by!


Bunny Birthday - Pretty Pink Posh

 Hello Crafty Friends! Everyone knows I love a good stencil so you can imagine how excited I was for this bokeh layer stencil and THEN Tim released the new Pink Kitsch Flamingo and it was a match made in heaven!


I used Kitsch Flaming, Spun Sugar & Picked Raspberry for the background with the new stencils. I did some simple copic coloring on the bun with some C1 & C2 for shadows, RV11, RV10, RV00 for the frosting and candle with a bit of YR31. I popped him up on the new Valentine Circle and stamped the sentiment in a curve around the edge. 

Thanks for stopping by!


Sparkling Birthday - Pretty Pink Posh

 Hello Crafty Friends! Birthday, Birthday & More Birthday! I NEVER have enough birthday cards. So I've really been concentrating on building my stash back up. I just adore the new Birthday Cake Die from Pretty Pink Posh & just how easy it is to get an eye catching card in a few minutes.

For the background I used the new Speckled Egg distress oxide along with Peacock Feathers and Chipped Sapphire inks in a gradient effect. Then I die cut the background die out of some silver sparkle paper. I left the inside piece of the cake stand in to give it some weight. I just love how it looks. I also stamped the sentiment in the Peacock Feathers Oxide ink as well. I also under the Simple Stripes Dies to cut it out. I feel like using a die cut banner looks a little more polished then just straight cuts from a trimmer. 


Thanks so much for stopping by!

Celebrate - Pretty Pink Posh

 Hello Crafty friends! Back with some more birthday inspiration for you featuring new Pretty Pink Posh products from the January Release. 


For the background we ink blended with the new Kitsch Flamingo, Peacock Feathers and Cracked Pistachio. These have to be my top distress ink colors right here and I love how they look in a blend! Then I took the new Layered Confetti Stencils and ink blended on using white pigment ink. 


The image is from the new Valentine Circles set but I wanted to show this set is very versatile and works for more than just Valentines. This was colored using some copic markers and I attached directly to the background because I knew I wanted to have the die cut go across part of it and I didn't want to add dimension because of it. Lastly I die cut 2 of the sentiment to layer on top to pop it up a bit. 

Thanks for stopping by!


Letters to the heart - PPP

 Hello Crafty Friends! Im back with new Pretty Pink Posh. 


I used a Slimline Scallop Frame, the envelope from All my Love & a sentiment from an older set School Friends. I used distress oxide ink blended on the background in worn lipstick, abandoned coral and candied apple. I used those same inks to stamp out the little envelopes. I filled in the hearts by water coloring a bit with the same color. I added a bit of stickles to the hearts too for a bit of sparkle. Lastly I heart embossed the sentiment and added some red heart sequins. Its not strictly a Valentines Themed card so I feel like it would work any time of the year.

Thanks for stopping by!


Bun Cupcake - Pretty Pink Posh

 Hello Crafty Friends, back here with the first of a little series of birthday cards. All the main birthdays in my family are in November and December and I am always running low on cards by this time of the year. So to start off I have this adorable bunny card for you!


The background is done with Abandoned Coral, Picked Raspberry and Worn Lipstick distress oxide. I white heat embossed the sentiment with detail white embossing powder. The sentiment and the critters are all from Cupcake Critters stamp and die set. The critters are colored with Copics in E53, E51, E50; W3, W1, 0; E39, E37, E35; YR30, YR31; C3, C1, C0; RV14, RV13, RV11, R29, R27, R24; R20, R11, R00. Also has a bunch of diamon stickles on it but its hard to capture in a photograph.


Thanks for stopping by!

Wicked Fun - Pretty Pink Posh

 Hello Crafty Friends! Ive got another Halloween card for you. I never used much of these even though I make lots. But I sure did this year! Lots of kiddos need a treat in their mailbox. 


Distress Combo: Milled Lavender, Wilted Violet oxide with a bit of black soot ink on the top edge. I also splattered the background with the same black soot. 

Copic Combos:N8, N6, N4; C3, C1 & C0; V20, V17; E47, E44, E43, E21, E11, E00; R20


Stamp Supplies:
Halloween Pals
Trick or Treat Friends


Thanks for stopping by!

A little Batty - Pretty Pink Posh

 Hello my Crafty Friends! Im here today with a spooky Halloween inspired card today featuring some goodies from Pretty Pink Posh!


To start I inked the background in Twisted Citron distress oxide down 3/4 of the card leaving the bottom the white of the cardstock. I then brought in Mowed Lawn around the edges of the Citron. That still wasn't dark enough for me so very lightly I went over that with some black soot. I then took some of the white gold Starry Colors and splattered the background as stars for my spooky night scene. 


The two bat images are from the Boo stamp set which I copic colored N8, N6, N4, N2 & N0. I also used these same greys on the outfit of the little girl from the Trick or Treat Friends stamp set. Her Green shirt and tights are YG23, YG21 & YG00. The little pumpkins are also from this set and are colored with YR04, YR02 & YR00. The moon was a last minute addition insisted on by my Husband. ha! I think it was a great idea. For some fun dimension I used a mini action wobbler! Check out my instagram stories to see it in action.  Lastly I white heat embossed the sentiment (Also from Boo) on some black cardstock to ground my images. 


Thanks for stopping by!

Box of Love - Pretty Pink Posh

 Hello Crafty Friends! Happy Monday! Im here with a card featuring one of my favorite sets from Pretty Pink Posh Cuddly Cats. 


First I should mention that this card is smaller than A2 at about 3 1/2 x 4 3/4. I am loving this size! I dont know what it is other than its just something different and therefor exciting lol. Anyways I ink blended the background using distress oxides, splattered the background with gold watercolors, white heat embossed the sentiment and copic colored the images. The distress ink combo was very much Inspired by Kristina Werner. I never use Ground Expresso but I loved her unique combos and so worked outside my box!

Distress Oxides:
Speckled Egg
Crackling Campfire
Ground Expresso

Copics:
C9, 5, 3, 1 & 0
E44, 43, 40
BG01, 000
W5, 3, 1
R20, 11, 00


Thanks for stopping by!

Helping Small Businesses - Cape Cod Resilience Fundraiser

I am joining my friend Jenn Shurkus in her efforts to raise funds for small businesses in Cape Cod.  Jenn lives on Cape Code and is raising funds to donate to Cape Cod Resilience Fund. You can help by purchasing one of Jenn's exclusive Cape Cod stamp sets. For each set sold between June 15th-July 1st, $10 will be donated to the CCRF. Another way to help? Spread the word! More details can be found on Jenn's main post HERE. 

I'm here to showcase different ways to use this set to show the versatility for everyone (even if you don't live in Cape Cod). I have three cards to share with you today featuring this exclusive set.


Each card featurs several images from the stamp set. The first two cards features a no line watercolor look with distress oxide ink watercolor painting. I also added rock candy glitter that was dyed to match the colors I was using; red for the lobsters and tan for the sand. I used a Tim Holtz tutorial to tint my rock candy and I love how it adds all the yummy texture, especially on the sand.

Lastly I did some spotlight ink blending behind diie cut circle windows and some easy copic coloring for my last card. Cape Cod was a very magical holiday spot for me as a child. I have so many great memories of playing on the beaches there and going whale watching. I plan on taking my son *soon. 

Thanks so much for stopping by! I hope I gave you some fun ideas on using this wonderful set.


Missing You - Pretty Pink Posh

Hello Crafty Friends! In my bid to get ahead the other day I made a whole bunch of ink blended backgrounds. Because inkblending was going so well that day I decided to do a few more involved ones. 


For this one I used masking and with masking taped off the bottom of the card. I proceeded to ink blend with a light tumbled glass for the sky. To get a lighter application I chose a large brush and started on the tape moving slowly into the card stock and fading the color so it was darkest near the horizon. I then dried that with a heat gun so I could mask off the sky without trying to get the tape to stick to wet ink. For the pond I wanted something kind of murky looking. I started with a base of peacock feathers and then around the outside edge I used some evergreen bough to tone it down.


For copics I went way outside my normal greens and reached for my dark BG colors for this card featuring the frogs from the Pond Friends stamp set. BG78, BG75, BG72 for the big frog and for the little one I used BG75 as my darkest and added BG70 for my lightest. the lily pads and cat tails were done with BG99, BG96 & BG93. Tops of the cat tails were E44, E43 & E40. The little lily flower was RV11, RV10 and RV00.


Thanks so much for stopping by!

Sea Friends - Pretty Pink Posh

Hello Crafty Friends & greetings on this Memorial Day. I have a non Memorial day card for you but its still a wonderful card to send to those you a missing today especially on days like today.

For this card I started with the background which is a three color blend with distress oxides. I used with Tumbled Glass, then Peacock Feathers and finished with Mermaid Lagoon. Then I took out my Waves Stencil, sprayed the back with some pixie spray & then placed it on top of my blended background. I took the same Tumbled Glass oxide ink and blended that over the first 2/3rds of the card. For the bottom I switched  to the Peacock feathers over the Mermaid Lagoon giving the whole thing more ombre effect. I love how it turned out!


I took a clue from my friend and fellow Pretty Pink Posh team mate Gemma with her recent post on copic color combos using this darling starfish from Sea Friends. I used some of my favorite pastel colors on these. For the Orangy Peach I used YR02, YR00 & R000; the pink one is R20, R11, R00 with a light coat of RV00 over the whole thing (glazing techniques are fun and can expand your color palette) Lastly I used Y02, Y000 for the yellow. The dolphin I used N6, N4, N2 & N0. Of course I finished the whole thing with sparkling clear sequins to act as my bubbles!


Thank you for stopping by!